DeepSeek-V3 is an open-source MoE (Mixture of Experts) model featuring a staggering 671 billion parameters, rivaling the high-performance benchmarks of GPT-4.5 and Claude 3.7 Sonnet. Known for its exceptional capabilities in coding, mathematics, and working with extended contexts, DeepSeek-V3 has set a new benchmark for AI models.
Running DeepSeek-V3 locally offers critical advantages, including enhanced data privacy, offline access, and the ability to customize the model to specific needs. This guide will walk you through the essential steps to deploy DeepSeek-V3 locally.
Before setting up and running DeepSeek V3 on your system, you need to ensure that your hardware meets the required specifications. Here’s a detailed breakdown of the minimum and recommended hardware requirements to help you achieve optimal performance.
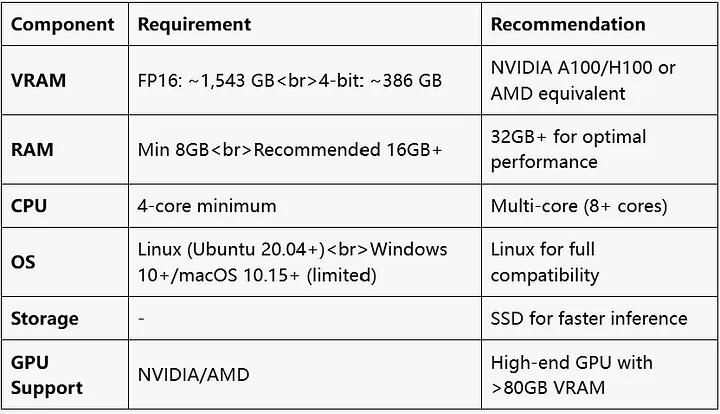
To run DeepSeek V3, especially smaller, quantized models, your system should meet at least the following specifications:
Depending on the size of the model and whether quantization is used, you need 200–400 GB of storage to accommodate both the model and associated files adequately.
To achieve the best performance and reduce inference or processing times, a more robust setup is recommended:
Deploying multiple GPUs significantly boosts performance, especially for larger models. Some recommended configurations include:
Use NVMe SSDs with read and write speeds exceeding 3,500 MB/s. Faster storage ensures quick loading and retrieval of model data, which is critical for large-scale operations.
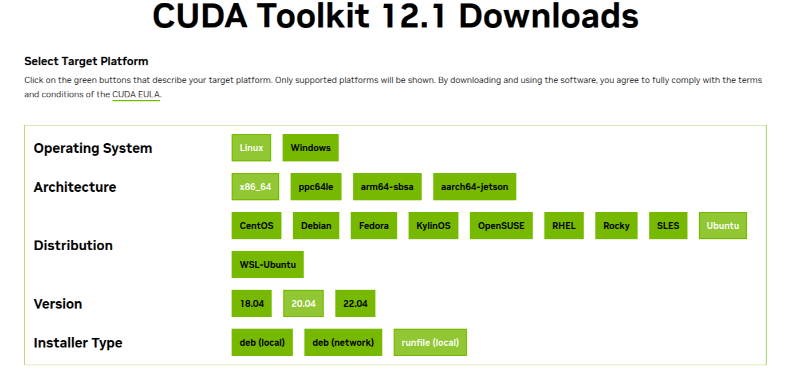
Ensure you have CUDA Toolkit version 12.1 or later installed. This is essential for enabling GPU acceleration, ensuring DeepSeek V3 can fully utilize your system’s graphical processing capabilities.
If your hardware is limited, consider using a 7B quantized model. These models are optimized to reduce the load on your system, making it possible to work within lower resource limits without sacrificing functionality.
By ensuring your system aligns with these specifications, you can set up and run DeepSeek V3 effectively, achieving smooth operation for your specific use case.
Also Read: How Many Images Can You Upload to DeepSeek? >>
To ensure a smooth and seamless deployment of DeepSeek V3, it’s crucial to complete the following pre-installation steps. These steps cover installing essential dependencies and optimizing your system for best performance.
Proper installation of the required tools and software will prepare your system for DeepSeek V3. Below is a detailed guide:
Git is necessary for cloning repositories. Install it using your system’s package manager:
Verify the installation by running git --version.
Conda simplifies package and environment management for Python-based projects like DeepSeek V3.
Download either Miniconda (lightweight) or Anaconda (all-inclusive) from their official websites.
Once installed, make sure conda is added to your PATH. Verify by running conda --version.
For improved performance and compatibility, make the following system adjustments before proceeding:
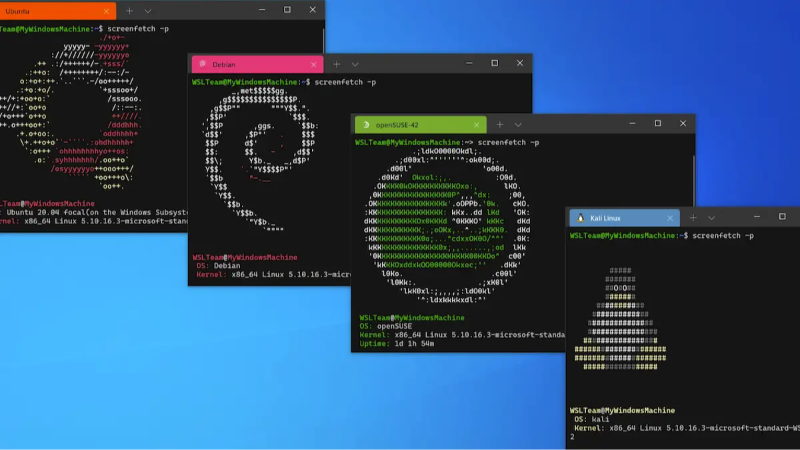
If you’re on Windows, enable the Windows Subsystem for Linux (WSL) to ensure compatibility with Docker and Linux-based tools:
To simplify model and resource management, define environment variables.
For example:
OLLAMA_MODELS=/path/to/models
export OLLAMA_MODELS=/path/to/models
By completing these steps, your system will be fully set up and optimized for deploying DeepSeek V3. Having the correct dependencies and configurations in place ensures efficient operation and minimizes deployment issues.
Also Read: Is DeepSeek Down Today? How to Check and Troubleshoot >>
To deploy DeepSeek V3 locally, you can choose from several methods depending on your technical expertise and preferred workflow. Below, we’ve detailed four deployment methods, ranging from beginner-friendly to more advanced setups.
This method is user-friendly and suitable for those with limited technical expertise.
Once the model is downloaded, you can begin testing it directly through Ollama’s command-line interface (CLI). For a more intuitive experience, integrate with tools like Chatbox or Open WebUI to use a graphical user interface (GUI).

This method offers flexibility for developers who want to customize and fine-tune their setup.
git clone https://github.com/oobabooga/text-generation-webui
cd text-generation-webui
pip install -r requirements.txt
python download-model.py deepseek-ai/deepseek-llm-7b
4. Launch the Server with Quantization
python server.py --load-in-8bit

LM Studio provides a simple, GUI-based deployment option for users with little to no coding experience.

This enterprise-grade option leverages Docker and Open WebUI for high scalability and advanced features.
docker pull ghcr.io/open-webui/open-webui:main
ollama run deepseek-v3
http://localhost:3000
By selecting the deployment method that best suits your needs and expertise, you can get started with DeepSeek V3 quickly and effectively. Whether you’re a beginner, developer, non-coder, or enterprise user, these methods cater to a range of use cases to ensure a seamless deployment experience.
Also Read: How to Use DeepSeek AI to Supercharge Your Work >>
Enhance performance with the following strategies:
Use 4-bit or 8-bit quantization (--load-in-4bit/-8bit) to minimize VRAM usage while maintaining acceptable accuracy.
Use Tensor Cores (--tensorcores) on compatible GPUs for faster processing.
For CPU inferencing, use .gguf models with frameworks like LM Studio or Llama.cpp.
Fix: Opt for smaller models (e.g., 7B 4-bit quantized version) or use a GPU with larger VRAM.
Fix: Allocate more CPU threads (--threads 16) or ensure GPU parallelism is enabled.
Update the model name in configuration files or UI settings.
Now you know everything about how to run DeepSeek V3 locally. Running DeepSeek-V3 locally allows unprecedented control over performance, costs, and data privacy. Whether you’re a beginner or an experienced developer, one of the methods outlined above should meet your needs.
Don't wait to explore! Test DeepSeek-V3 on your local machine by downloading the appropriate models from Hugging Face or visit the official DeepSeek repository. Happy experimenting!


